Your Guide to Creating Press Ready Print Files
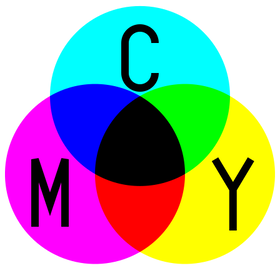
colour space – CMYK
Nailing the correct colour is key to staying on brand. A printing press uses a colour space called CMYK to produce similar colours using just four colours of ink: cyan, magenta, yellow and black. When you send your files to a commercial printer, they MUST be in CMYK in order to look as close to your digital design colours as possible.
If you have to use a spot colour, you’re probably using a colour from the Pantone Matching System (PMS). Speciality inks like metallics, neons and unique colors will also have to be run as spot colours.
A PMS colour is a specific numbered colour in the Pantone Matching System used to facilitate accurate and consistent colour reproduction. It’s a commonly used system of spot colours that helps press operators achieve the exact same shade, every time. Consistency is paramount!